DIY boxes for Valentine's Day. DIY boxes for couples gifts for lovers
Idea number 12(I continue the numbering in the first article of this year) Piñata!
What it is? I’ll quote Wikipedia: “Playing with a piñata is somewhat reminiscent of a children’s game common in Russia, when blindfolded children with scissors in their hands try to cut candies suspended in a row on strings. The piñata is also hung (at home on a hook to the ceiling, also on the street or in the garden on a tree), one of the children is given a stick in his hands, blindfolded and (optionally) spun in place (the rest of the children constantly move around to confuse the striker, sometimes - to avoid injury from the stick - quite far away or sit down), then he trying to find and break the piñata to get the candy contents."
You can put anything there: little surprises, small gifts, happiness vitamins (remember what those are?) and candy, of course!
How to make one piñata in the shape of a heart, see bklynbrideonline.com or (copy of page)
Golden piñata(very beautiful) - how to make -

Found on bklynbrideonline.com
(photos by Amanda Thomsen and tutorial by Brittany Watson Jepsen)
There are a lot of design options. Here are these hearts in higher resolution:
The pinata can be any shape - here's a moon pinata (a hint of romance under the moon)

Found on diyordie.elleinterior.se
A piñata can be made based on a balloon (inflate the balloon, cover it with paper - papier-mâché - take out the balloon - put gifts, seal it, decorate)
For more details, see the links to master classes under this photo.
Take a heart-shaped ball and your valentine pinata is ready!
So, how to make a piñata based on a balloon with your own hands, watch these master classes:
number 1 and number 2 and number 4 (English, but everything is clear even from the pictures)
Be sure to check out more on the topic of piñatas
Valentine's Day gift idea number 13. A gift in a basket of an improvised balloon. I wrote about various types of balloons in this article, and let’s consider this a continuation))
It makes a very beautiful design for a small gift.
I think everyone understands how to do it
Valentine's Day gift idea number 14. Gift with a marine motif. A note and a message from a mysterious stranger!
Come up with a legend (this is not an easy task to help you), buy a beautiful bottle in the home decor section of the supermarket (there are many of them!)
and create!
The gift can be wrapped in several bags, each carefully sealed with tape and hidden at the bottom of the abyss of the sea bath
We tested it - this idea works! The main thing in implementation is so that the gift does not float to the surface(if it is light).
Take this into account! When we gave a flash drive and filled it with beer (because the gift needs to be washed, right?) in front of the amazed hero of the occasion, the plastic packaging with the flash drive had to be weighted in advance with a bag of coins.
Photo by Zoe in NZ
Photo by Zoe in NZ
By the way! If you're using candles to create ambiance, try this surprise idea (you'll love it)
Valentine's Day gift idea number 15. A gift with the motto “I give you the key to my heart.” It’s as banal as the word “LOVE”... But how you want to be told it, how anxiously you wait for it! Same with the key))
Give it only if it is sincere!
Interestingly:
you don’t have to write a wish-declaration of love, but apply on satin ribbon!
It will look very impressive:
how to apply text on a satin ribbon - see in detail in this master class or this one, and also watch this video
(using a printer, iron and thermal transfer paper(aka Transfer Paper)
Please note that the text must be flipped upside down (so that when “translating” the inscription using an iron, the inscription can be read correctly)
You can also beat a long tape like this: (write) 1... 2... 3... 10... 20... no.. 25... and yet 45... 10,000... you know Still, I can’t count how many times I would like to kiss you! You are so tender, so loved!
Let's combine two ideas - a key with a ribbon on which your confession is written!
Insert into frame:
From all of the above, another idea is born: to put your recognition, wishes, and compliments to your loved one on something: a T-shirt or this! pillowcase: let it be Valentine's Day gift idea number 16!
Valentine's Day gift idea number 17. I already wrote about this once, but the idea is great, it can be repeated, I think))
The idea is this: format your congratulations in the form of an announcement.
That is, it will turn out like this:

Source kindovermatter
You can write:
I love you. Kisses... And write where exactly))
Such notices can be hung at home or glued to a gift box.
You can hang several along the route of your loved one. For example:

"You are beautiful! (beautiful)" Photo by Deb Did It
Valentine's Day gift idea number 18. The motto of the gift is “You light up my life!”
If you love someone, that's how it is, right?))
You can choose a lot of things for this idea, for example, a lamp (about this)
I draw your attention to the cool design of the gift itself. Here's a postcard (the light bulbs are fingerprints)
By the way, the gift itself can be thrown on top with a garland (and also plugged into an outlet through a hole in the box - by the way, this is an idea! The main thing is to ask to close your eyes, put your hands on the gift, ask to make a wish Don’t distract with stories about your love and compliments and turn off the lights!)
Well, okay, we digress))
Another option to convey the same message:

By Levi Brown, source realsimple.com
Valentine's Day gift idea number 19. Motto " You are my pearl!"The idea is simple and ingenious: we take two baking tins and put a gift in them. We fasten them with tape and tie them with a bow.
A good gift for girls with a nautical name (Marina)

Found on pinterest
Valentine's Day gift idea number 20. You are my sweetie (You are my sweetie) - this is the leitmotif of this gift (or rather, a way to beat the gift).
The gift is hidden under sugar hearts. You can write a note, fold it and tie it with a ribbon. And the edge of the tape is showing a little))
How to do it?
Valentine's Day gift idea number 21. I have already written about this idea in relation to birthdays, and I will repeat it again. The idea is brilliant! Honestly!

Source ohhappyday.com
What's the point: you send several postcards by mail, which are put together like a puzzle so that your loved one can read the most important message!
You can also add a secret code there (the address at which you can download your audio greeting on the Internet (which is very cool, here’s my experience) or the phone number of the person who has the surprise gift hidden (here’s how we did it).
In general, here you can play with this idea as your heart desires))

Source ohhappyday.com
In the original article the essence is slightly different: for the birthday different people they sent postcards and they all then composed a single congratulation poster.
I'm crazy about this idea!

Source ohhappyday.com
Valentine's Day gift idea number 22. Let's take a break from such creativity)) Let's remember the wonderful old idea of giving a heart in the palms of our hands.
You can draw it, or you can do it like this:
Valentine's Day gift idea number 23. What's great about this gift idea is that it's three in one: a gift, a card, and a gift box.
It looks like this from the outside:
It opens and inside there are many, many warm words, your photographs (or inspiring pictures - these are the ones I had in mind)
And a gift - an invitation to a romantic evening, for example:

Source
Today I want to present you with a master class on how to make a heart box with your own hands. The box itself is already a work of art, but you can pour, for example, delicious sweets into it, and then give all this beauty to your loved one. Today's Valentine's Day gift master class is based on weaving from newspapers.
To make the box we will need:
- newspapers. But as a replacement, this master class presents a cash register tape, which can be bought at an office supply store. Tape width 5.8 cm, length 40 cm.
- paints;
- cardboard;
- wooden beads (optional);
- paper.
Take cardboard and cut out 2 hearts from it. To simplify the work, this master class uses a ready-made heart-shaped box. We cut out the base from cardboard, taking the base of the finished box as a template. Then we use a measuring tape to measure the length of our future box. Next we need to calculate how many weaving axes we will place. In this case, it turned out to be 18 mm, but you can position the axes a little more often. Apply markings from the center of the heart.


 Next, our task is to prepare paper for gluing the bottom of our future box. In this case, we take an ordinary sheet of paper, crumple it long and hard to create an interesting texture. Glue a straightened but crumpled sheet of paper onto cardboard heart No. 2 using PVA glue. To avoid unpleasant effects, let it dry under a stack of books for 10-12 hours.


While the base dries, prepare the tubes. We take a knitting needle and wind a cash register tape or newspaper diagonally around it. When finished, coat the tip with glue to prevent the tube from unraveling. The resulting tubes need to be painted in the desired color. For Valentine's Day, red, pink, and white are considered traditional. It is important to let the tubes dry thoroughly.


It's time to glue our tubes to heart No. 1. You can use PVA glue, but for reliability, super glue is better. The tubes are glued strictly according to the markings on heart No. 1. We do decoupage on the top heart No. 2. You can cut out a design from a paper napkin, or you can simply buy red or pink napkins and cut out hearts from them, then stick them on the bottom of the future gift.


We glue both cardboard hearts together, and for everything to work out well, we put them under a press for several hours. After that, we proceed to the most interesting part - weaving.

It’s difficult to describe in words, but from the photographs, I think everything will be clear. We weave the first row horizontally, then we raise the axes and weave the vertical walls. It is more convenient if there is a base box inside our homemade box. If desired, you can add beads.


The most difficult thing in this weaving is to close the top so that it turns out beautifully. We walk the entire row in a tube in front of two, bending behind the third.
The last three tubes. Bend the first one in front of the two and carefully push it under the first axis with which we started braiding. We bend the second one in front of the third one and lead it inside the basket. Then look at the photographs, they are much clearer than words.


And now our DIY gift for Valentine's Day is ready. Now you can fill the box or basket, as you like, with interesting contents and hand it over.

On February 14, many people around the world will celebrate Valentine's Day - the most romantic holiday of all lovers. This holiday is celebrated in memory of Saint Valentine. He was a priest and patron of all lovers.
In honor of this holiday on February 14, many themed parties are held; couples in love give each other valentines, flowers and sweets.
It is for this holiday that we will make a heart box, which will serve as an excellent frame for a gift for Valentine's Day.
What we need:
- Cardboard. It should be of two types: regular (for children's creativity), and especially dense (1-1.5 mm thick).
- Velvet paper (this can be replaced with regular colored or decorative paper, or you can use fabric).
- Cotton fabric.
- Ruler, compass, pencil.
- Glue stick or PVA, or any other glue for paper and cardboard.
- Glue gun with silicone glue.
- Ribbons, braid, beads for decoration.

Let's start making the pattern for the box (see picture below).
We draw two circles with a diameter of 5 cm, the distance between the centers is 7 cm (line 3). From the upper point of intersection of the circles we put 14 cm down (line 4). We connect the circles tangentially to the bottom point of line 4. We get a heart. There should be 6 such hearts. Moreover, they should be of different sizes: large, medium and small. The medium one should be 3 mm smaller than the large one, and the small one should also be 3 mm smaller than the medium one. This is necessary so that the lid fits freely on the box.
Large:
- diameter: 5 cm
- line 3: 7cm
- line 4: 14 cm.
Average:
- diameter: 4.7 cm
- line 3: 7cm
- line 4: 13.4 cm.
Small:
- diameter: 4.4 cm
- line 3: 7cm
- line 4: 12.8 cm.
A big heart 1 PC. – made of thick cardboard (top of the box lid).
Average heart 3 pcs. - 2 pcs. from ordinary cardboard and 1 pc. from thick (top of the bottom of the box).
Little heart 2 pcs. – from ordinary cardboard.
In addition to the lid and bottom, we need to cut out the sides of the box. There should be 2 of them. – for the lid or bottom.The board should be approximately 55 cm long and 4+4+2 cm wide (10 cm). Cut a line 2 cm wide along the entire length in a zigzag. If there is no cardboard of this length, then the board can be glued together in two parts - 29 cm each.

Fold the board in half (4cm by 4cm) and glue it. Cut the remaining allowance of 2 cm with a zigzag. Glue the side to the middle heart made of ordinary cardboard. We do the same with the second side, only we glue it to the small heart.
We cover a large and medium heart made of thick cardboard with velvet paper. At the same time, we cut out hearts from velvet paper + an allowance of 1.5-2 cm (cut it with a zigzag, fold it onto the back side of the heart and glue it).
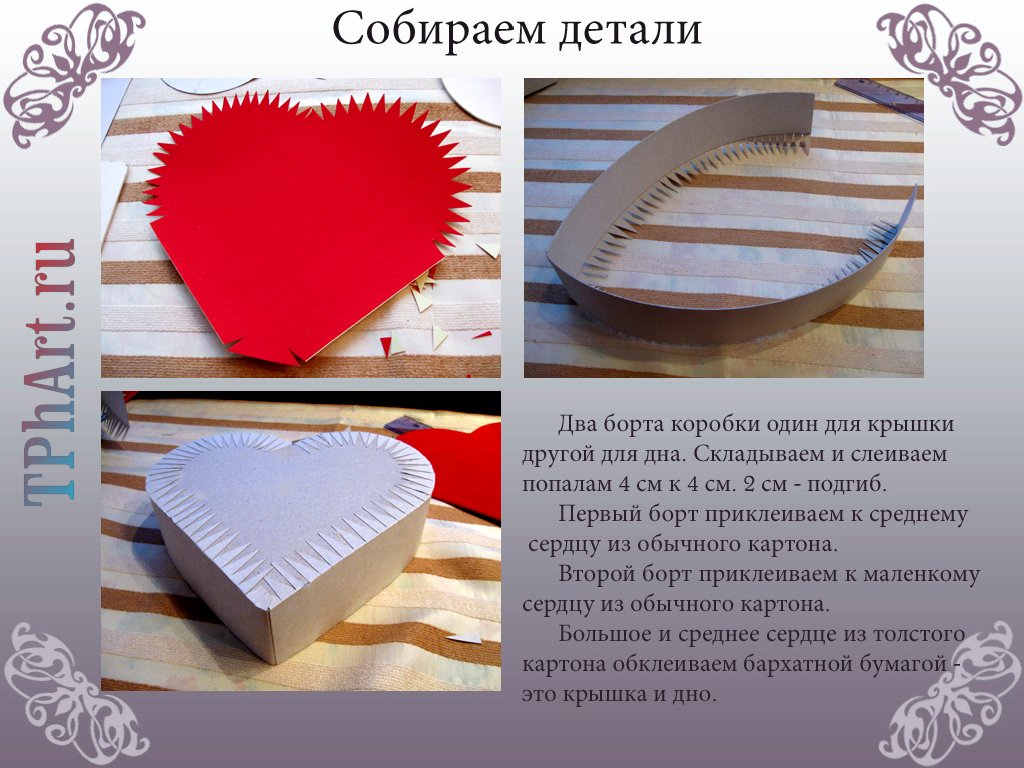
We cover the sides with fabric. It is best to glue cotton fabric with a glue stick. We glue the sides of the lid on both sides (on the outside and on the inside), and we glue the sides of the bottom of the box only on the inside. This is necessary so that when opening or closing the box the fabric does not rub against each other or get in the way.
In the same way we glue two hearts - medium and small. We glue them inside the box (i.e. we get the bottom of the lid and the bottom of the lower part).
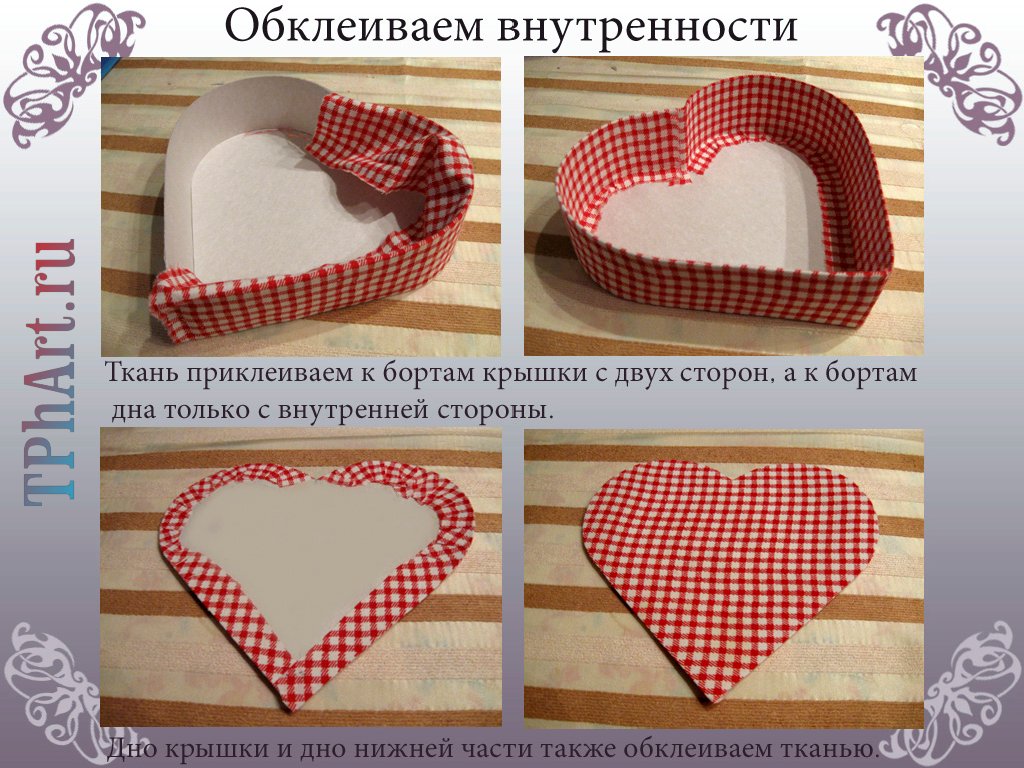
We cover the edge of the side of the bottom of the box with tape so that it does not get wet.
We glue hearts made of thick cardboard covered with velvet paper accordingly: a large heart to the lid (medium heart), and a medium heart to the bottom (small heart). We glue the edges of the velvet hearts with braid using a glue gun. We also glue the braid in the middle of the outer side.

We decorate the box with roses from satin ribbons (how to make them can be found on the Internet), leaves from corrugated ribbon, soutache and halves of plastic beads (the beads are very easily cut in half using wire cutters or pliers).
Now you can put any gift in it, as well as candies or other goodies.

Liked? Would you like to receive other master classes and gifts by e-mail?
Tell us where to send it and receive it!
For work you will need: colored cardboard and paper, scissors, tape, tape or braid, glue and cotton wool.
First, decide on the size of the future box and its color; based on these parameters, you will need to select a sheet of cardboard. It depends on the size of the prepared surprise and your own preferences.
Carefully bend the edges of the tube inward on one side. Place a prepared gift or love note with sweets and hearts into the resulting package.
Now you can start decorating the package. To do this, cut out multi-colored hearts of the same size from colored paper or cardboard. Glue them in a circle to get a beautiful and voluminous flower.
You can use a tightly rolled cotton ball as the core of the flower. Spread it with glue and dip it in semolina or glitter to make it look more original.
Using glue, secure the flower arrangement to the finished box. You can create a variety of decorative combinations to suit your taste.
These packaging boxes can be made in a variety of sizes. When decorating, you can also show your imagination and create a composition from all kinds of elements: butterflies, hearts, beads, sequins, lace and decoupage. Your loved one will certainly appreciate the effort and love put into preparing the surprise.
What is an unusual gift to give to your loved one for Valentine's Day? We will tell you - make him a Valentine's box with a surprise with your own hands, which will definitely surprise and delight your soulmate!
To do this you will need:
Colored cardboard, scissors, glue
Ribbons, rhinestones, lace, edging ropes
Any other decorative elements
First you need to print and cut out the box templates, then transfer them to cardboard.
Then we cut out our blanks, fold them along the fold lines and glue them together. We should have 2 parts - internal and external.

Think in advance whether the parts will be the same color or different to create contrast.

When our box details are ready, we start decorating it. You can cut out decorative hearts and flowers from paper or fabric, sew buttons and lace onto the box. Glue inscriptions with wishes and declarations of love. Create, fantasize! The box should be the most extraordinary valentine your loved one has ever received as a gift.

Now let's talk about the surprise itself, what could be inside the box?
There are many options for surprises - it could be a Valentine's card, a mini-book with wishes and poems about love, or a mini-photo album with your photographs. It is also possible that the box will contain any sweets.

Another very original surprise option that you can make yourself is the key to your heart. To do this, you need to cut out 2 hearts from fabric, sew them together and stuff them with filling. After which you can tie a small key to the heart with the inscription “The key to my heart” - we are sure that such a gift will be very touching and pleasant.


If you are familiar with the technique of felting (filting) wool, then you can make a wool heart. You can learn more about how to make it from the article on dry felting a heart.